Sunday, December 30, 2012

My business, my baby...June Jewels

Hi everyone, like promised, I would share with you guys this week all about my on-line shop called June Jewels.
 

June Jewels began on Etsy.com in 2009. For my new reader that don't know too much about me, I was raised in a family business that have been supplying rough and finished-turquoise to jewelers internationally since 1994. Over the years, I slowly realized how much I have learned about not only the jewelry-making process, but also many other aspect of the industry such as gemstone history, origin, and manufacturing processes. I started June Jewels right before starting my MBA program to pay for textbooks, but I quickly realized how happy I was running my own little business and I knew I would continue it as soon as school was over.

People often ask me if I ever get tired of jewelry and beads, I say "Never!" Because to me, creating jewelry is like creating history, a piece of jewelry made with genuine stones can last for centuries; its value becomes priceless and its story becomes everlasting!  

I truly enjoy sharing my expertise and be able to provide the material to all the jewelry lovers out there doing what they love.  My favorite part about running June Jewels is when my customers send me pictures of their work using my products; it just makes my day! I currently run this shop with the help of my husband who I have been married to since 2007. He is a firefighter and is just the most hard-working, genuine, and noble person I know. He loves his job and have always encouraged me to do what would make me happy no matter what anyone else thinks. So here I am, doing what makes me happy and hope to create as many happy customers as I can along the way!

You can check out June Jewels by simply going to www.junejewels.com, click the image below, or click the product gallery I have recently added to the right side of this blog. 

Until next time :)


Monday, December 17, 2012

Turquoise Nugget Bracelet and Earrings

I want to start off by apologizing for how long it has been since my last post. I have been super busy with my on-line store sales that I have been struggling to find a balance between work and "life". I guess I didn't anticipate the amount of sales when I started in October and thought I had more time to slowly grow, plan and well...blog! lol. Now that I'm starting to feel the momentum of my little operation, I think I am going to be much better at managing my time in every aspect. So don't give up on me yet...lol! And...for those who are wondering, I will officially introduce my on-line shop next week on this blog so you guys can see what I have been up to :)

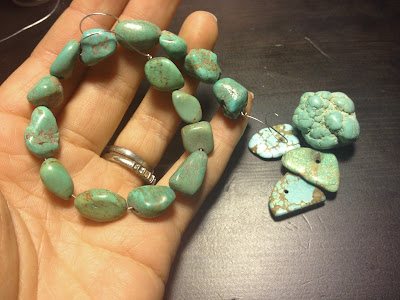
This week, I just wanted to quickly share a special request I completed over the weekend for one of my husband's friend. I love the fact that my friends and family immediately think of me whenever any conversation related jewelry pops into their heads. So as a result, I get lots of special requests since practically everyone has some type of broken jewelry they want to transform into something special. This request in particular was actually just a bag of rough turquoise given by a grandparent; he wanted to transform and gift it to his wife for Christmas. So to start it off, I had to tumble and drill the stones into semi-smooth nuggets as seen below.
Because I don't have the fancy equipment that factories in China has to cut stones into different shapes, nugget shape was the best I can do with the rough that was given to me. From there, I decided to go simple because nuggets are considered to be very earthy, so complicated designs would actually overshadow the raw beauty of these stones.
Small accents of sterling silver findings on the bracelet with lobster-claw clasp, and regular headpin with a loop twist onto the lever-back earring hoops. On a side note, I love lever-back earring hoops because it adds an instant look of elegance and NO annoying rubber backing that goes onto the typical fish-hook wire, lol. 

So that's it for this week, I got a busy weekend ahead of me since I always procrastinate on holiday shopping lol. But I am super excited next week to share with you my on-line shop, so make sure you check back! Happy Holidays!


Friday, November 16, 2012

Ring Tutorial: Making a ring with a flower bead


Hi all, thought it was time for another jewelry tutorial! In my very first blog post, I showed everyone how to make rings out of everyday-buttons. At the end of that post, I also mentioned that I will demonstrate that same technique with beads that are made for jewelry-making purposes. So this is it; making a ring with a button bead. Many beads are drilled off-centered such as this bead I used below, they are mainly made this way for a dangling effect on earrings or bracelets. But with my method of wrapping these into individual rings, you will be able to get a lot more worth for each bead that you pay for.
Again, the technique used in this tutorial is practically identical to my first post; "Make Rings out of Buttons!" Same materials are used as well for this tutorial, so to save time, I'm not going to repeat the material list. Steps are as follow:
Wrap the wire through the flower stem onto the mandrel and wrap few times around the mandrel. Play with the length of the wire starting at 2 feet, that should be plenty to wrap 8-10 times around the mandrel. When desired width of the ring shank is reached, wrap the remaining wires around the stem(bottom) of the bead.
Take the ring off the mandrel, wrap wire on each side of the shank once then pull with pliers to ensure both sides are equally tight. Continue to wrap around the shank, snip off the ends on top of the shank so your fingers will not be against the sharp ends of the wire. 
Put the completed ring back onto the mandrel to shape the roundness of the shank. And viola! You've got a wearable ring!

Hope you will try this tutorial, it really is as easy as it looks! If you are in the business of making and selling jewelry, when analyzing cost versus sale-price, you'd know that rings are sold at the highest margin compared to any other piece of jewelry. Since beads like these are typically sold by a batch, using these individually to make rings will yield much higher profits than using them as earring or bracelets. Of course this is just me speaking from my point of view based on my experiences; there are plenty designers out there that can up-sell anything lol. So this is it for this week. Hope you all like it! Comment if you have any questions or suggestions :)

Sunday, November 4, 2012

Palette Mash Up with Denim and Lace

Since my last Pallet Mash Up of Red and Blue, I realized I how often I use the Mash Up method to put together outfits not only from my own creations but other random images of inspiration as well. This weekend, I wanted to put together an outfit that I have been thinking about for a long time; Denim and Lace. I realized how many of my "Pins" from Pinterest had this combo and decided to finally make one for myself. So the concept of Pallet Mash Up again is basically finding an inspiration, and re-creating that look without copying it. In the process, pre-owned and on-sale items are preferable. So below is my inspiration, followed by my own creation.
My outfit this weekend; Denim Chambray and White Lace Skirt
(I tied a knot in the front instead of tucking the shirt into the skirt, much more comfortable!)
Shirt: American Eagle Chambray, $18.99 on clearance.
Skirt: Forever 21, $21.99 regular price.
Shoes: Target, $8 on clearance.
Bag: Michael Kors, $239 outlet price (I only have 3 two-hundred-dollar range bags that literally goes with everything lol)

Saturday, October 27, 2012

Making use of the free stuff from Clinique Bonus Kit

Hi all there, this week's post is just gonna be short and sweet since I have a super busy weekend. So you all know how much I like saving money, well, how about making use of something that's free?!? I'm talking about the free blush brush that's in Clinique Bonus kit almost every time!

I lost my make up brush yesterday (don't know where lol), and I was just desperate to find something this morning that can last me until I get a new one. While digging through my vanity, I came across this little brush in my Clinique Bonus kit, and I realized I had like 5 of these from the past and NEVER used them. So I used it with my Bare Minerals and then noticed it was the perfect size to just leave in my powder jar. It's a convenient way to store a brush that's SANITARY and FREE!!!! I don't know about you, but my old face brush just sat in my make-up bag and would get super dirty, with this little thing, it stays clean!

I know what you are thinking, this would get messy on the go. But don't worry, the newer design of Bare Mineral powder jar takes care of that, see below; it closes!!! So I'm gonna use this old-design jar at home until it runs out (I'm sure many of you still have at least one of these oldies), and use the newer one on the go! Until next time :-)

Saturday, October 20, 2012

Lose weight in the winter, with "Brown Fat."

I have to start off by saying, I was very hesitant to write this post because I don't like to discuss weight and I think everyone looks beautiful in their own skin. But I think for those who are looking to lose weight, instead of seeking for pills, this might be the CHEAPEST way to add that small boost to any diet plan. Since you know how much I like ideas that save money, here it goes! lol.

So I believe everyone has an "idle weight," the weight we stay at when we eat and do the normal daily routines without feeling hungry or stuffed at the end of the night. For me, that weight is usually 125. But for years, I tell me friends and family that I somehow hit 121 every fall with no effort of trying to lose weight. The picture below is me a week ago, and you can go to my earlier post, Pallette Mash Up with Red and Blue, to see a pic of me when it was a little warmer. I know it's hard to tell with different outfits and all, but I can tell. Of course, I get really embarrassed at the same time talking about 4 pounds because I don't want people to think that I'm trying to lose weight like I'm anorexic or something. So the other day, I decided to Google this mystery until I found something...and I did!!! I'm not crazy; it's scientifically proven! The answer is Brown Fat; according to an article written earlier this year by The New York Times "Brown fat, actually brown in color...one form of it, which is turned on when people get cold, sucks fat out of the rest of the body to fuel itself." You can read the full article here:

Brown Fat, Triggered by Cold or Exercise, May Yield a Key to Weight Control


Of course I think there are other factors that can affect this, such as people tend to eat heartier foods in the winter, or more junk food at holiday parties...but I believe, in general, it does work because I have honestly been saying it for years! So from the perspective of Not Too Fancy, "save some money on utilities by keeping the thermostat's temperature a little lower, and lose some weight along the way! Lol."

Wednesday, October 10, 2012

Shower Curtain Rod as Shoes/Heels storage

I love Pinterest, especially for all the great DIY ideas! But I don't know about you, I have never actually made the time to try any of them out. So this past weekend I finally tried something I saw on Pinterest, and it was so worth the effort! Do you sometimes want to try something and worry that it's not as easy as it looks or it might be a wasted effort all together? So I figured I would start trying things out and post my experience here on my blog so you can get an actual testimonial before trying it out yourself. I will list all my DIY attempts like the format below. So check back with me often!
Is it really DIYable?    Yes
Total time spent: 12 min
Total Cost: $20 ($10 for each shower-curtain bar)
Recommendations: Use a leveler (no need for the fancy laser ones, just a basic one with the bubble indicator lol.) Put the rod up first without worry about how straight they are, nudged them into leveled positions with a leveler underneath the bars, then tighten as necessary.


Hope you'll try it out! Until next time :-)

Tuesday, October 2, 2012

Flushable wipes as Toilet cleaner

Hi everyone, I know this is a very UN-glamorous post, but we all have to clean the toilet one time or another, might as well do it efficiently, right?! Since the invention of the Clorox Toilet Wand, I have said goodbye to the good old gloves-and-brush, but it wasn't until recently that I realized how fast I was going through the refills at almost $.70 a pop. Not only that, I didn't like the fact I had to dispose the refill into the trash can...gross!

So then I tried Scrubbing Bubbles version with the disposable refills. But it worked like crap and wasn't cheap either!

So I came up with a cheaper and better solution; using the Scrubbing Bubble wand with flushable wipes as refills! Just get 3 or 4 pieces of flushable wipes, scrunch it up, and clamp it with the wand. These wipes from Costco are strong and very well-priced compared to Cottonelle, the best part, it's completely flushable. To save even more money(yes, it's possible lol), use the wipes for other less-gross surfaces first such as the sinks and vanity and then attach it to the toilet wand to do the dirty work. Hope you'll try it! Until next time ;-)


Monday, September 24, 2012

Wear your sleeveless as a scarf!

Happy Monday everyone. It's getting a little chilly here in Albuquerque and the fall fashion trends are quickly kicking in, and no other article of clothing defines the feel of fall more than a scarf. Different colors and patterns of scarfs can be found at any department stores and it's a great way to dress up any outfit. But at the average rate of $20 per scarf, you would find that the cost of scarfs can add up quickly. By using the many sleeveless you already have, you can dress up any outfit without spending extra money on scarfs.


Although this post is about saving money on scarfs, it was not my original attention. I was doing a gem show in Denver last week, and what started as a sunny warm Tuesday ended up with a full storm by Wednesday. Because I did not pack for the cold weather, my suitcase was filled with sleeveless tops. I was layering my sleeveless to stay warm, and through the changes, I caught a glimpse of one sleeveless top sitting around my neck and decided to go with it! lol. And as it turned out, no one noticed that it was a shirt and I even received some compliments on my turquoise shirt/scarf. To demonstrate that this "scarf-faking" will pretty much work with any shirt, I attached another example below.


Both shirts were from Forever 21 and were both under $10

Quick instruction:
Put on the sleeveless shirt over your head onto your neck without putting your arms through the arm-holes, tuck around whats hanging in front you until the arm-holes are unseen. It is essential that it is a "sleeveless" with no collar, because any other shirt will hang lots of extra fabric you can tuck away lol.

Try it out, it's free lol. Until next time!

Tuesday, September 18, 2012

Robin's Egg Nest, how to make a "Bird Nest" Pendant

Hi again everyone! As mentioned in my last post, I was working at Gem Shows the past two weekends. During the show in Tucson, two of my customers wore these necklaces where the pendants looked like bird nests and I thought they were the cutest thing! So of course right then and there, I grabbed some wire and decided to replicate the same thing from memory. We had natural turquoise beads at our booth, so that was my natural choice of material. I used 7mm rounds in natural Hubei turquoise which is about $18 per 16" strand wholesale. But, you can get 7mm blue rounds made out of resin, glass or even plastic for about $1 per 16" strand. You should find them on Etsy or Ebay, that's all they should cost, so do not pay more!!! For the wire, I used the base-metal 24 gauge again (like in my first blog post on button rings).
Start out with about a yard of wire and string it through the beads. Then bend it into a triangle, and wrap triangle as many times as you'd like. When both ends of the wire has about 6 inches left, wrap one though one side of the triangle to secure the nest, and this side will be the top of the pendant.
Use the other end of the wire to wrap but the other two sides. The wire from the first side you wrapped will become the bail/loop for the pendant. So create two large loops with that wire and twist it 180 degrees with pliers. Once the twist creates that bails, it's pretty done, the excess wire can be wrapped around the bail, snipped off, or behind the nest to create the "back of the nest."
The best part about making these is that NEATNESS DOES NOT COUNT! I did a general search of "bird nest" on Etsy and saw hundreds of different versions of them, and I actually think the messier the better! lol.  I don't know why I wasted all the effort to keep it neat, I probably just over-analyzed it as I do with everything in life...lol. I wanted to re-do this messier before posting but decided it's better to showcase both ends of the spectrum. If you have any questions, please ask or comment! Until next time :-)

Wednesday, September 12, 2012

Shorts with long-Sleeve Shirts

Hi guys, sorry for how long this post took. I worked at a 4-day gem show in Tucson, AZ last week and literally only had enough time to eat and sleep. But my main reason for not posting is that my hotel did not have free internet!! Can I just say that I can't stand pretentious "fancy" hotels that claim to be 3.5 stars and yet charge extra for everything such as parking and internet! Seriously does more "stars" mean only more money and not more value? Anyways, this week I am in Denver, CO doing a 5-day show, and I am eager to say that I am much happier at my 1 star hotel in Cherry Creek with free internet!

When I am at these shows, I meet amazing people and even prestigious designers, so it's important that I look my best at all times. But easier said than done, like many girls out there that are busy busy busy, dressing up like a model with high-hills just isn't realistic for most days. At these gem shows, we are setting up 20-30 feet booths filled with merchandise, constantly cleaning and selling to customers. So it is important for me to dress as comfortable as I can and look professional at the same time. It was hot last week in Tucson, so jeans and pants were out of the question, and skirts/dresses doesn't allow me to feel comfortable since I am bending down and moving merchandise all day long. Shorts were my go-to item but I don't like wearing shorts with sleeveless shirts because it looks too summer-ish and I feel that I would be showing too much skin in a professional environment. Wearing shorts with short-sleeve shirts or t-shirts feel too casual to me, like I didn't care to dress up at all. So my ultimate suggestion for working during late summer months are 'Shorts with Long-Sleeve Shirts." Long-Sleeve shirts with buttons are not-too-revealing and very professional, but not too up-tight either when paired with some cute shorts!

I'll make sure I get some time later this week before the show's over to make another post about the the jewelry shows or another jewelry-making tutorial, so make sure you subscribe one way or another. Talk to you all soon!

Left Pic: 
Turquoise shirt from Aeropostale, $14.50. 
Gray Corduroy shorties from American Eagle, $24.95.

Right Pic:
Vertical stripe chambray from Target, $19.50.
White Corduroy shorties from American Eagle, $24.95.

Monday, September 3, 2012

Palette Mash Up with Red and Blue!

Hi everyone, so my second post is about putting outfits together with Red and Blue. Bright colors are very hard to put together, but there are a few classic combos that just can't go wrong; and one of them is red and blue. The reason I threw B/W stripes and gray into the mix is to tone down the two main bright colors so the outfit is not too overwhelming with color. 


B/W Strips, Red and Blue
In the picture above, I put an outfit together through polyvore.com just so I can see the combination I brainstormed. In reality though, not only do I refuse to pay for those exact items, I don't even want to spend the time to find similar items lol. So I looked through my closet, and decided to put an outfit together using the same colors, but completely different items and order; so almost like a palette mash-up, see below.
Shirt: American Eagle, Featherlight Henley, $17
Skirt: Forever 21, Short Skirt, $5.80 (no joke, regular price!)
Shoes: Target, Red Ballet Flats, $9.99 (half off clearance)
Bag: A splurge...Coach Outlet, Gray Leather Satchel, $250 (originally $595)

Although the bag in my pic is a bit steep in price, nonetheless, I didn't incur new expenses to achieve this look; I'm using items I already have in my closet to create a brand new outfit inspired by my own palette. So I hope you enjoyed this post and will try to put together a brand new outfit from items you already have in your closet!

Saturday, September 1, 2012

Make Rings out of Buttons!

(Making use of those extra free buttons that comes with most shirt purchases)

Haven't you always collected those extra buttons that came with every shirt you bought thinking that one day you'll need it? The truth is, most shirts will go out of style before it looses a button lol. If you are like me, you have about at least a dozen of these babies on the bottom of a drawer near the vanity. Finally, I decided to do something with them. Why not making them into rings!!! So I got some cheap wire from HobbyLobby and went to work.
The wire I'm using is base-metal bead wire, 24 gauge; they are cheap enough for you to practice with and strong enough to last when worn. I got them 1/2 off during HobbyLobby's (every-other-week) promotion so they were only $1.25 or so. Because it is just mixed base metals, please be careful if you are allergic to any type of metals. My size-6 ring took about 30 inches of wire, so to be broad, I'm gonna say 1 yard (36 inches) is plenty for a ring of any size. Since this rollI is 24 yards, you can definitely make 24 rings for $1.25 of wire. That's about 5 cents per ring. Not too bad, right?

Before starting, due to some pulling of the wires, make sure you start the ring one size larger on the mandrel. So here's how you can make the ring:
  Put the wire through the hole of the button, wrap as many times as desire, then prepare to wrap around the actual button, one wire from the top of the button, the other from the bottom. After wrapping 3-4 times, take the ring off the mandrel and start wrapping around the band. You have to pull pretty hard to tighten the band, I just pulled the wire with the tip of my pliers. Snip off the excess, and you got yourself a ring for less than $.05, and definitely a conversation starter too!
Same technique works on two-holed buttons as well, see below

Different views of the rings:
Using the same method, you can use vintage buttons with sterling wire to make something more upscale. There are even gemstone beads made in shapes of buttons, so there are quite a few options out there. If I make a ring with a gemstone button later on, I will make another blog post showing it off. I hope you all enjoyed my first post, I'll be posting at least once a week, so I hope you'll subscribe!