Showing posts with label wire wrapping. Show all posts

Monday, December 17, 2012

Turquoise Nugget Bracelet and Earrings

I want to start off by apologizing for how long it has been since my last post. I have been super busy with my on-line store sales that I have been struggling to find a balance between work and "life". I guess I didn't anticipate the amount of sales when I started in October and thought I had more time to slowly grow, plan and well...blog! lol. Now that I'm starting to feel the momentum of my little operation, I think I am going to be much better at managing my time in every aspect. So don't give up on me yet...lol! And...for those who are wondering, I will officially introduce my on-line shop next week on this blog so you guys can see what I have been up to :)

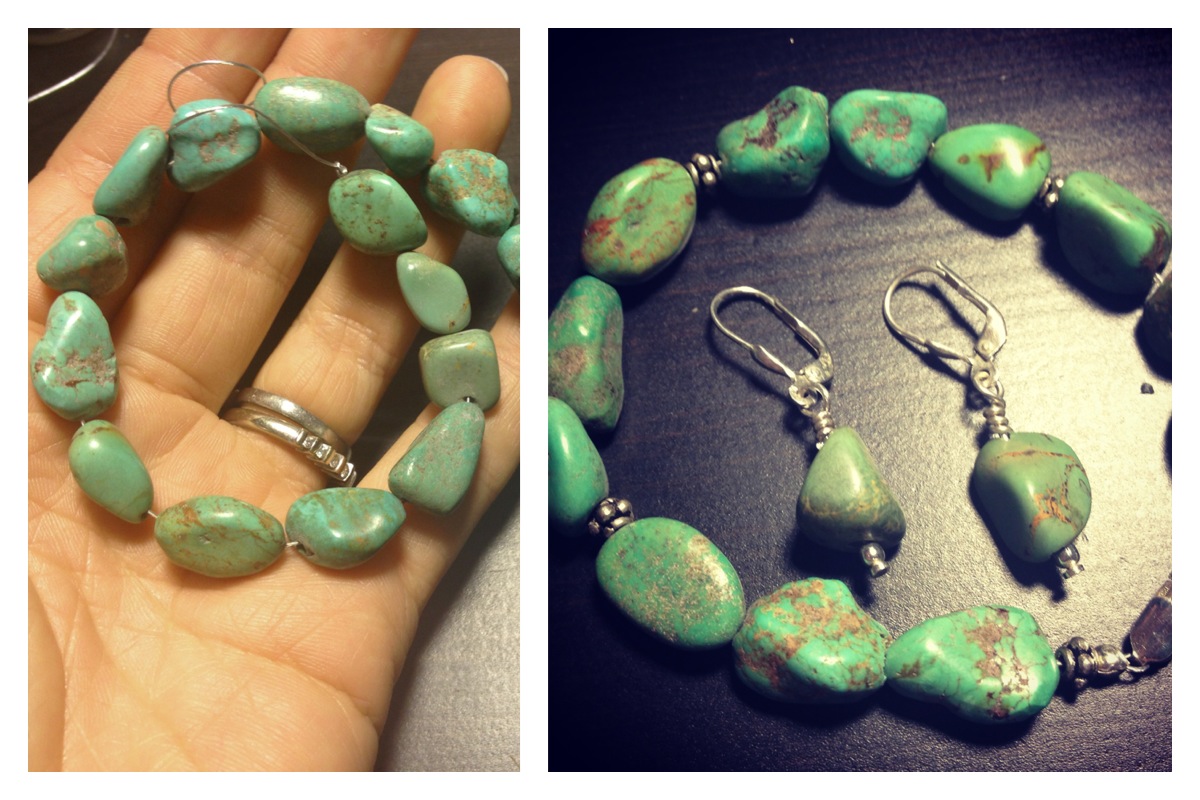
This week, I just wanted to quickly share a special request I completed over the weekend for one of my husband's friend. I love the fact that my friends and family immediately think of me whenever any conversation related jewelry pops into their heads. So as a result, I get lots of special requests since practically everyone has some type of broken jewelry they want to transform into something special. This request in particular was actually just a bag of rough turquoise given by a grandparent; he wanted to transform and gift it to his wife for Christmas. So to start it off, I had to tumble and drill the stones into semi-smooth nuggets as seen below.
Because I don't have the fancy equipment that factories in China has to cut stones into different shapes, nugget shape was the best I can do with the rough that was given to me. From there, I decided to go simple because nuggets are considered to be very earthy, so complicated designs would actually overshadow the raw beauty of these stones.
Small accents of sterling silver findings on the bracelet with lobster-claw clasp, and regular headpin with a loop twist onto the lever-back earring hoops. On a side note, I love lever-back earring hoops because it adds an instant look of elegance and NO annoying rubber backing that goes onto the typical fish-hook wire, lol. 

So that's it for this week, I got a busy weekend ahead of me since I always procrastinate on holiday shopping lol. But I am super excited next week to share with you my on-line shop, so make sure you check back! Happy Holidays!


Friday, November 16, 2012

Ring Tutorial: Making a ring with a flower bead


Hi all, thought it was time for another jewelry tutorial! In my very first blog post, I showed everyone how to make rings out of everyday-buttons. At the end of that post, I also mentioned that I will demonstrate that same technique with beads that are made for jewelry-making purposes. So this is it; making a ring with a button bead. Many beads are drilled off-centered such as this bead I used below, they are mainly made this way for a dangling effect on earrings or bracelets. But with my method of wrapping these into individual rings, you will be able to get a lot more worth for each bead that you pay for.
Again, the technique used in this tutorial is practically identical to my first post; "Make Rings out of Buttons!" Same materials are used as well for this tutorial, so to save time, I'm not going to repeat the material list. Steps are as follow:
Wrap the wire through the flower stem onto the mandrel and wrap few times around the mandrel. Play with the length of the wire starting at 2 feet, that should be plenty to wrap 8-10 times around the mandrel. When desired width of the ring shank is reached, wrap the remaining wires around the stem(bottom) of the bead.
Take the ring off the mandrel, wrap wire on each side of the shank once then pull with pliers to ensure both sides are equally tight. Continue to wrap around the shank, snip off the ends on top of the shank so your fingers will not be against the sharp ends of the wire. 
Put the completed ring back onto the mandrel to shape the roundness of the shank. And viola! You've got a wearable ring!

Hope you will try this tutorial, it really is as easy as it looks! If you are in the business of making and selling jewelry, when analyzing cost versus sale-price, you'd know that rings are sold at the highest margin compared to any other piece of jewelry. Since beads like these are typically sold by a batch, using these individually to make rings will yield much higher profits than using them as earring or bracelets. Of course this is just me speaking from my point of view based on my experiences; there are plenty designers out there that can up-sell anything lol. So this is it for this week. Hope you all like it! Comment if you have any questions or suggestions :)

Tuesday, September 18, 2012

Robin's Egg Nest, how to make a "Bird Nest" Pendant

Hi again everyone! As mentioned in my last post, I was working at Gem Shows the past two weekends. During the show in Tucson, two of my customers wore these necklaces where the pendants looked like bird nests and I thought they were the cutest thing! So of course right then and there, I grabbed some wire and decided to replicate the same thing from memory. We had natural turquoise beads at our booth, so that was my natural choice of material. I used 7mm rounds in natural Hubei turquoise which is about $18 per 16" strand wholesale. But, you can get 7mm blue rounds made out of resin, glass or even plastic for about $1 per 16" strand. You should find them on Etsy or Ebay, that's all they should cost, so do not pay more!!! For the wire, I used the base-metal 24 gauge again (like in my first blog post on button rings).
Start out with about a yard of wire and string it through the beads. Then bend it into a triangle, and wrap triangle as many times as you'd like. When both ends of the wire has about 6 inches left, wrap one though one side of the triangle to secure the nest, and this side will be the top of the pendant.
Use the other end of the wire to wrap but the other two sides. The wire from the first side you wrapped will become the bail/loop for the pendant. So create two large loops with that wire and twist it 180 degrees with pliers. Once the twist creates that bails, it's pretty done, the excess wire can be wrapped around the bail, snipped off, or behind the nest to create the "back of the nest."
The best part about making these is that NEATNESS DOES NOT COUNT! I did a general search of "bird nest" on Etsy and saw hundreds of different versions of them, and I actually think the messier the better! lol.  I don't know why I wasted all the effort to keep it neat, I probably just over-analyzed it as I do with everything in life...lol. I wanted to re-do this messier before posting but decided it's better to showcase both ends of the spectrum. If you have any questions, please ask or comment! Until next time :-)

Saturday, September 1, 2012

Make Rings out of Buttons!

(Making use of those extra free buttons that comes with most shirt purchases)

Haven't you always collected those extra buttons that came with every shirt you bought thinking that one day you'll need it? The truth is, most shirts will go out of style before it looses a button lol. If you are like me, you have about at least a dozen of these babies on the bottom of a drawer near the vanity. Finally, I decided to do something with them. Why not making them into rings!!! So I got some cheap wire from HobbyLobby and went to work.
The wire I'm using is base-metal bead wire, 24 gauge; they are cheap enough for you to practice with and strong enough to last when worn. I got them 1/2 off during HobbyLobby's (every-other-week) promotion so they were only $1.25 or so. Because it is just mixed base metals, please be careful if you are allergic to any type of metals. My size-6 ring took about 30 inches of wire, so to be broad, I'm gonna say 1 yard (36 inches) is plenty for a ring of any size. Since this rollI is 24 yards, you can definitely make 24 rings for $1.25 of wire. That's about 5 cents per ring. Not too bad, right?

Before starting, due to some pulling of the wires, make sure you start the ring one size larger on the mandrel. So here's how you can make the ring:
  Put the wire through the hole of the button, wrap as many times as desire, then prepare to wrap around the actual button, one wire from the top of the button, the other from the bottom. After wrapping 3-4 times, take the ring off the mandrel and start wrapping around the band. You have to pull pretty hard to tighten the band, I just pulled the wire with the tip of my pliers. Snip off the excess, and you got yourself a ring for less than $.05, and definitely a conversation starter too!
Same technique works on two-holed buttons as well, see below

Different views of the rings:
Using the same method, you can use vintage buttons with sterling wire to make something more upscale. There are even gemstone beads made in shapes of buttons, so there are quite a few options out there. If I make a ring with a gemstone button later on, I will make another blog post showing it off. I hope you all enjoyed my first post, I'll be posting at least once a week, so I hope you'll subscribe!